
Windows系统XAMPP安装Moodle教程
2018-11-12 06:52:53来源:博客园 阅读 ()

一.安装工具下载:
系统环境:
Operating System: Windows 10 Enterprise 64-bit (10.0, Build 17134)
集成软件:
XAMPP Version: 7.2.10,XAMPP主要就是搭建apache服务器和mysql数据库。XAMPP(Apache+MySQL+PHP+PERL)是一个功能强大的建站集成软件包。当然你也可以使用easy PHP或者wamp或帝国软件,这些都是集成包。你要是不想使用的话可以自己单独安装后自己配置。这里我使用xampp 7.2.10。
xampp最新版下载地址:https://www.apachefriends.org/index.html
安装Moodle 3.5.2的要求: PHP 7.0, MariaDB 5.5.31 or MySQL 5.5.31 or Postgres 9.3 or MSSQL 2008 or Oracle 10.2
Moodle下载:
Moodle最新版下载地址:https://download.moodle.org/releases/latest/ 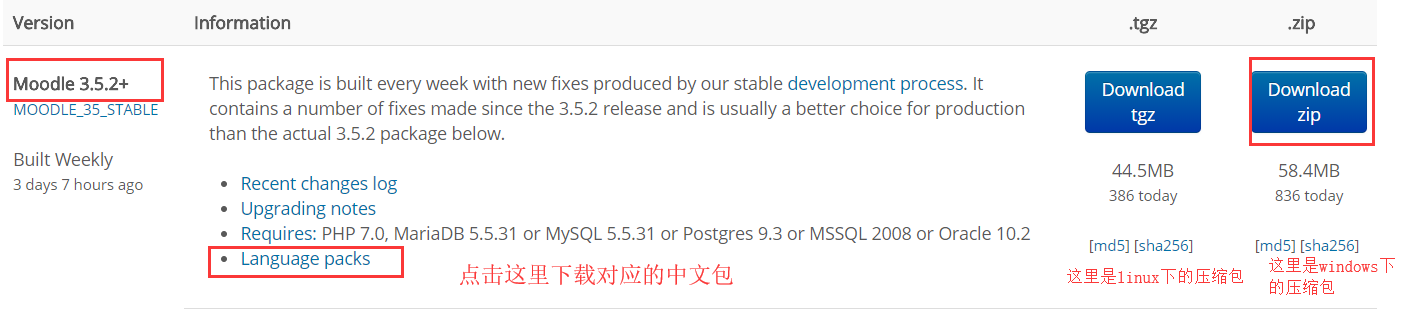
Moole 3.5.2+ : 后面的+表示Moodle是稳定版
如果要使用和我一样的版本的话,使用下面的下载地址:
链接:https://pan.baidu.com/s/1b0j2MLhdz1GzrXRiRVhFnA
提取码:tg73
二.安装环境配置:
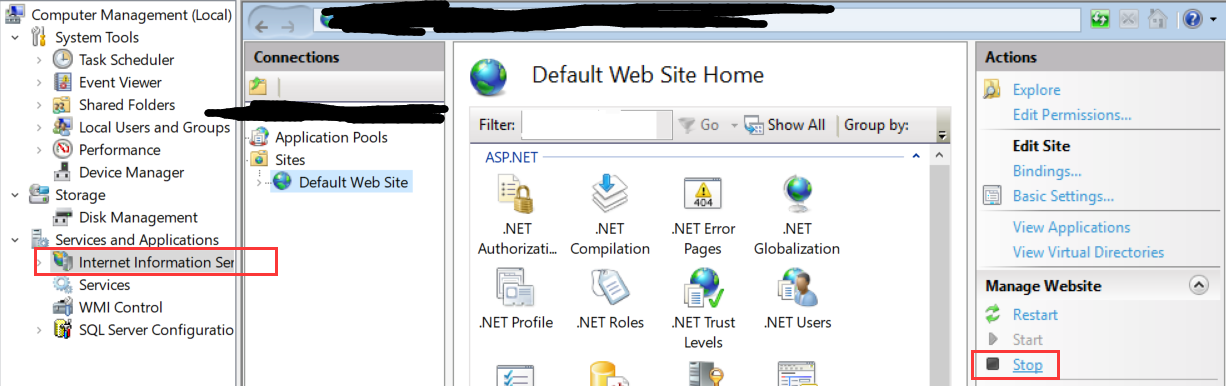
由于我的电脑上已经有IIS服务器了,IIS服务器使用的是80端口,你如果安装apache的话也会使用80端口,这样会造成冲突,所以我们需要配置IIS的端口。当然你的电脑上没有IIS的话不用执行下面的步骤:
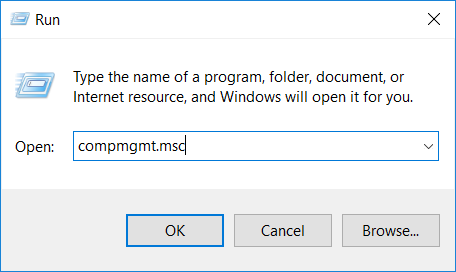
1.使用Windows+R打开运行,输入compmgmt.msc 打开计算机管理
2.定位到IIS管理,点击关闭
3.点击绑定,修改端口
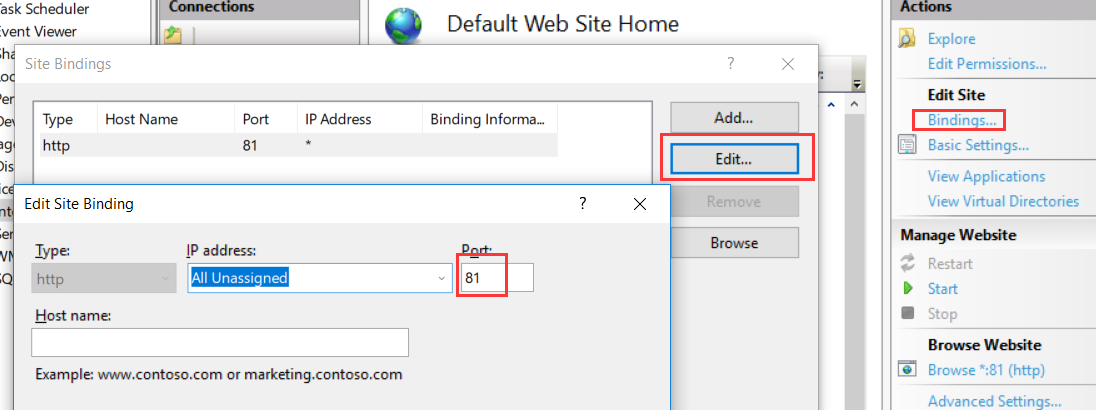
4.点击开始,然后在浏览器中输入localhost:81,可以看到已经可以访问到IIS了,这样端口就修改完成了。

三.开始安装
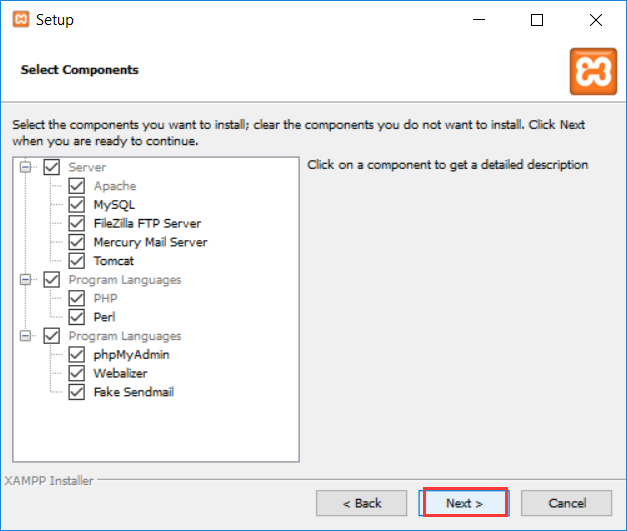
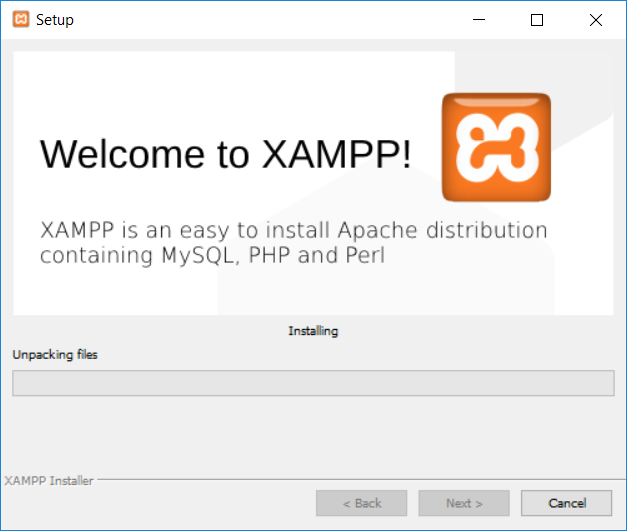
1.xampp安装:

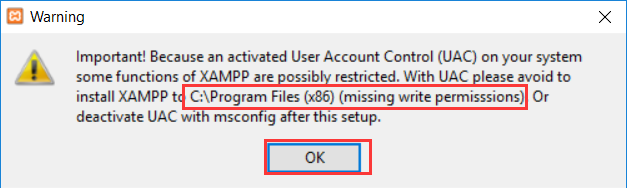
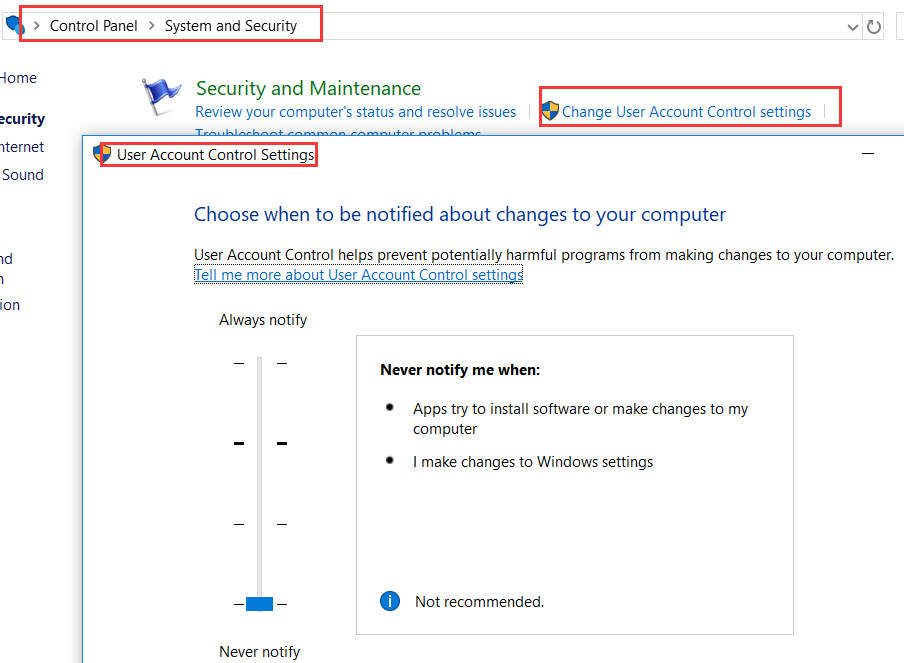
这里是让你不要安装到C:\Program Files(x86)文件夹下,因为它没有安装权限。UAC就是
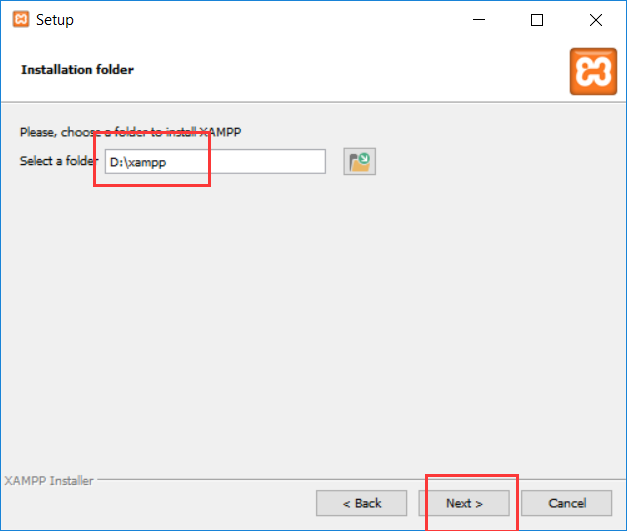
我这里安装到了D:\xampp,之后就一直下一步就行
安装完后,打开D:\xampp\xampp-control.exe
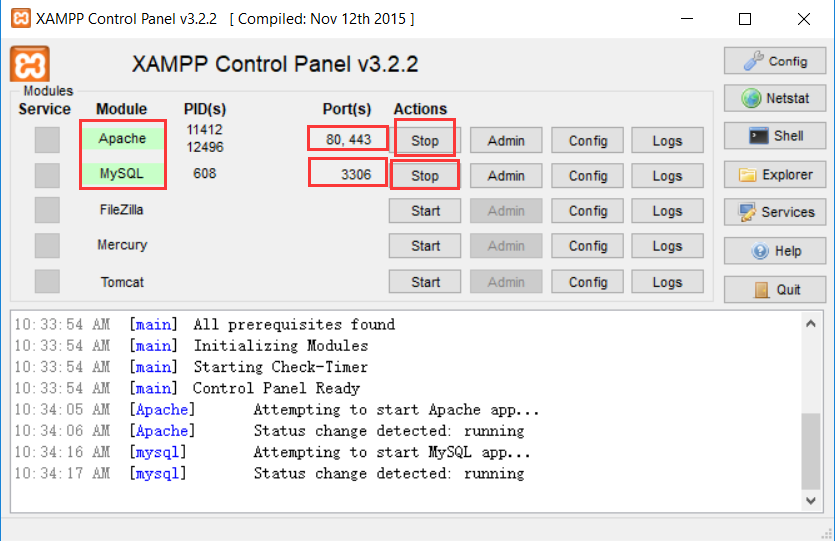
这里一定要保证apache和MySQL是绿色的才可以安装后面的步骤。
apache启动常见错误
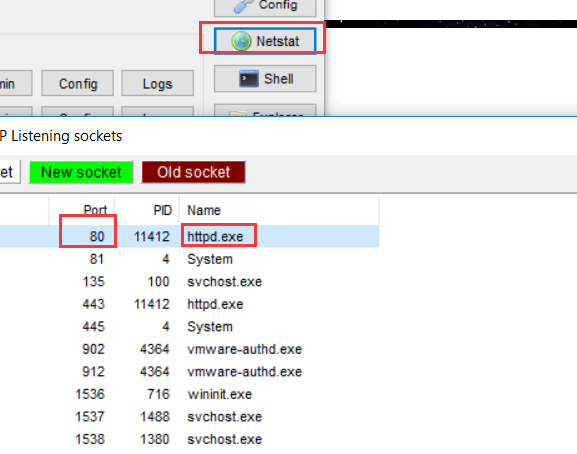
1.1有其他程序在占用80端口,你直接netstat找到占用端口的程序后,启动任务管理器,找到对应的程序结束后就可以。
1.2有其他程序占用80端口,任务管理器结束不了的话修改apache的监听端口为82,然后重启apache服务器。
注意:如果在这里修改为82端口后,之后访问apache的地址为: localhost:82 没有修改的话直接 localhost 就可以

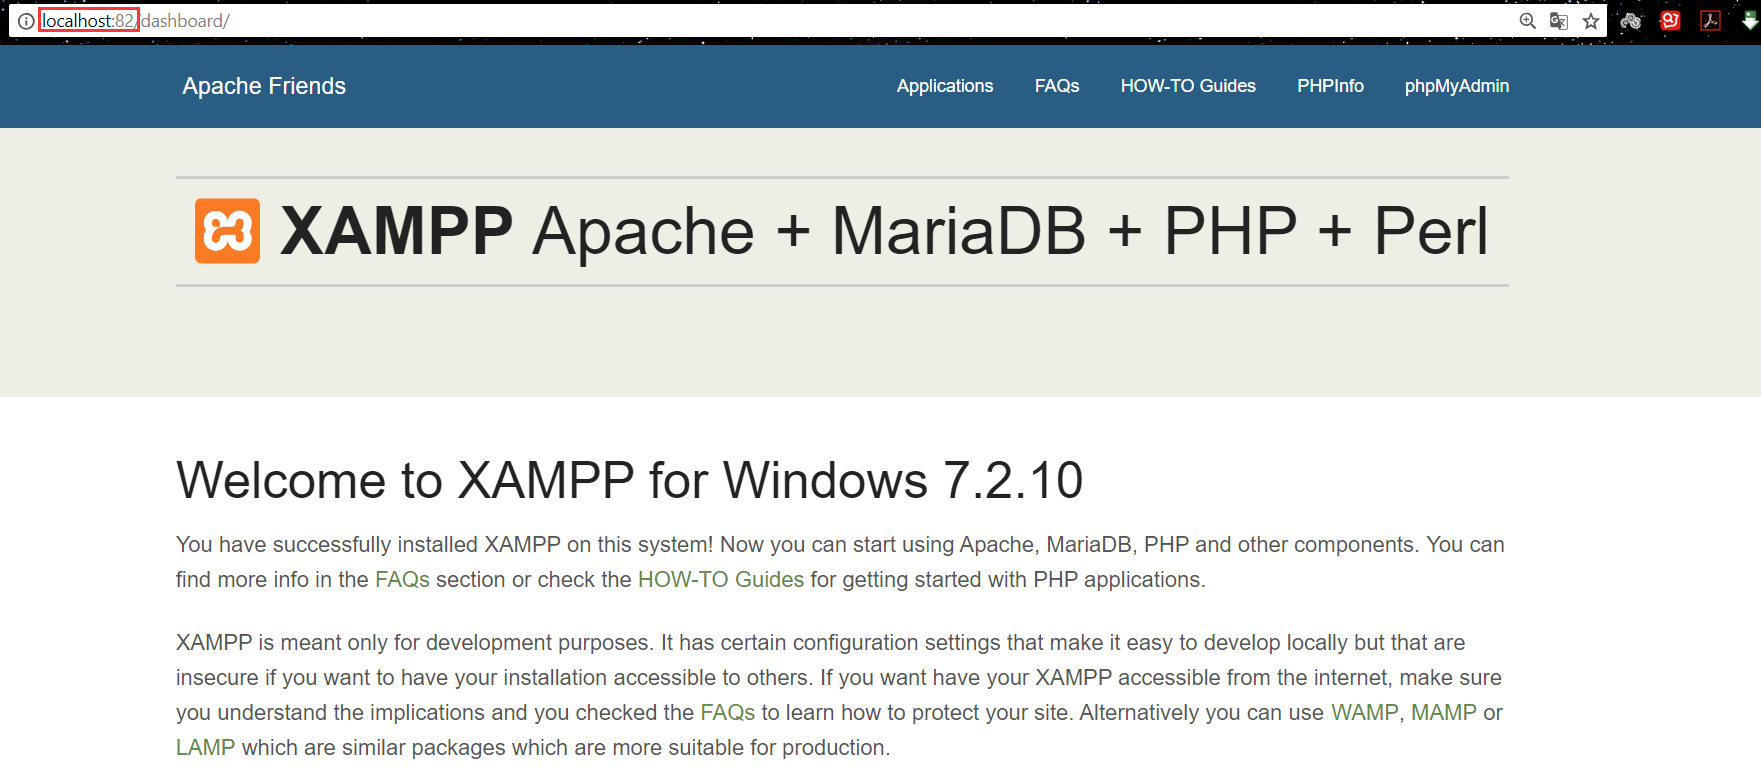
当你在浏览器中输入localhost后可以看到这个界面时表示apache已经正确安装
mysql启动常见错误:
以前安装过MySQL57或MySQL,没有卸载干净。
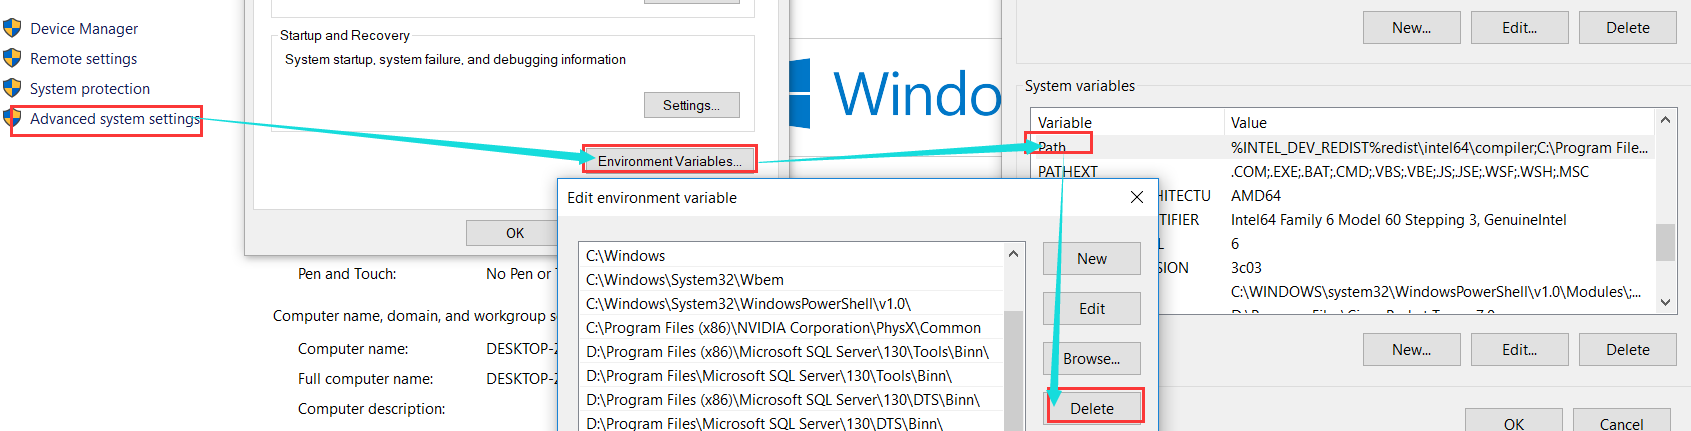
1.在环境变量PATH中将MySQL删除
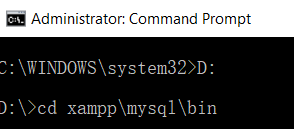
2.管理员运行cmd,cd 到D:\xampp\mysql\bin
输入sc query mysql,查看一下名为mysql的服务:
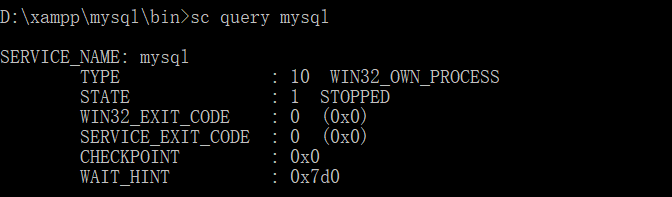
发现之前确实有安装过。
命令sc delete mysql,删除该mysql

输入安装命令mysqld install

此时,查看xampp-control.exe就可以发现mysql的服务就正常启动了
2.Moodle安装
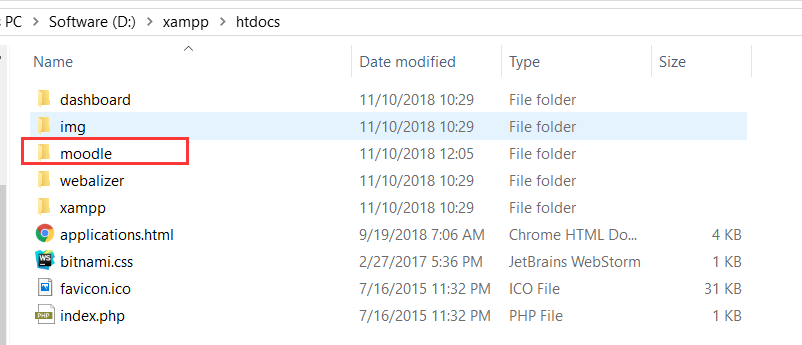
将下载的moodle-latest-35.zip解压后,拷贝其中的moodle文件夹到D:\xampp\htdocs
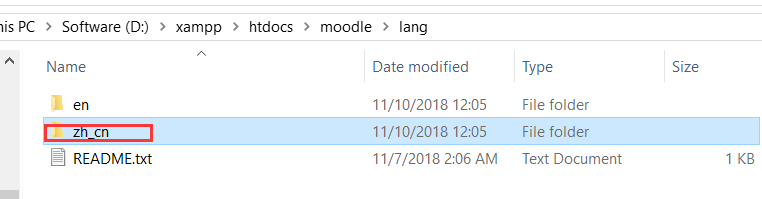
将下载的语言包zh_cn.zip解压后拷贝到D:\xampp\htdocs\moodle\lang下
在浏览器地址栏(之后默认都是在地址栏中输入)中输入localhost/moodle 如果你之前改过Apache的端口为82 ,则这里应该输入localhost:82/moodle
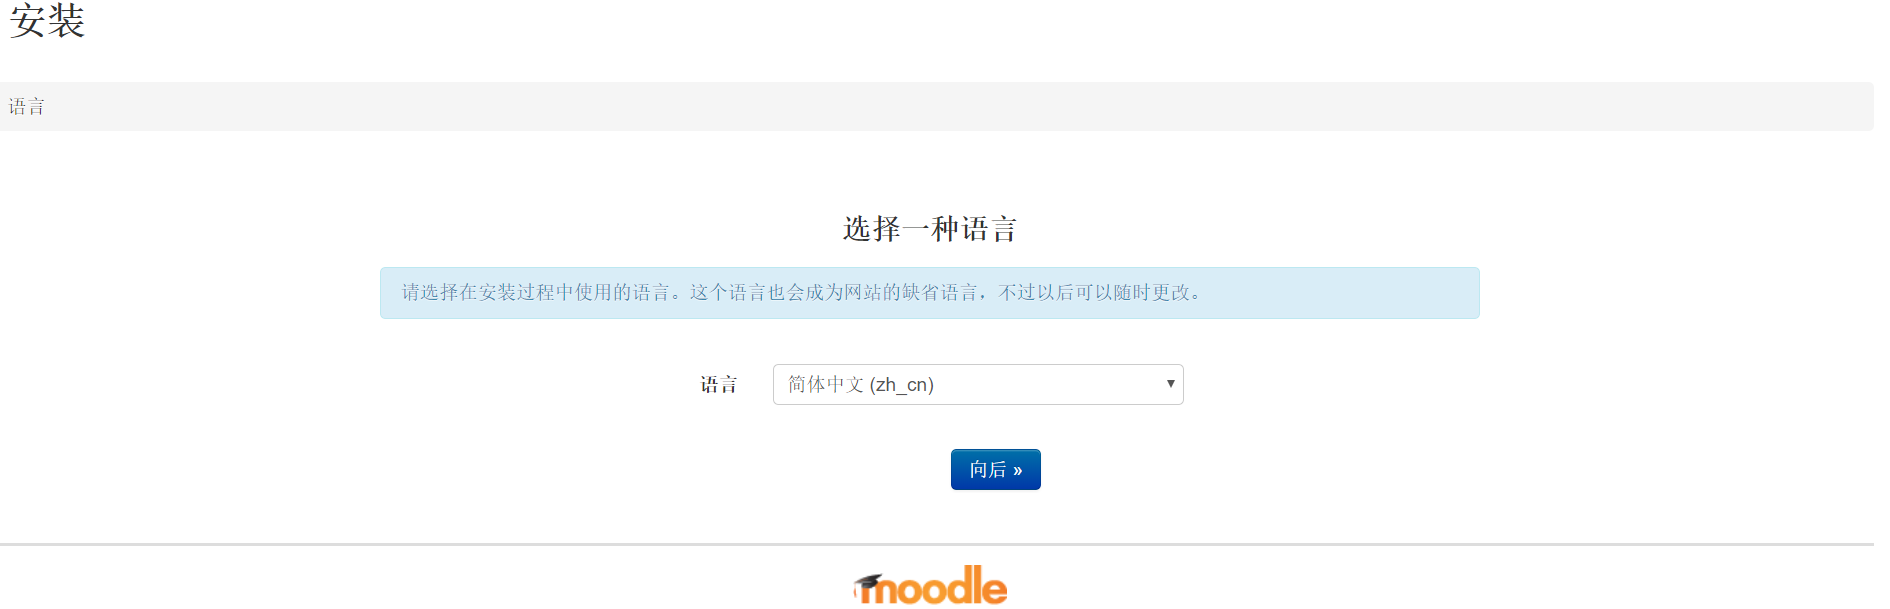
直接一直next:


到了这一步会有以下错误:
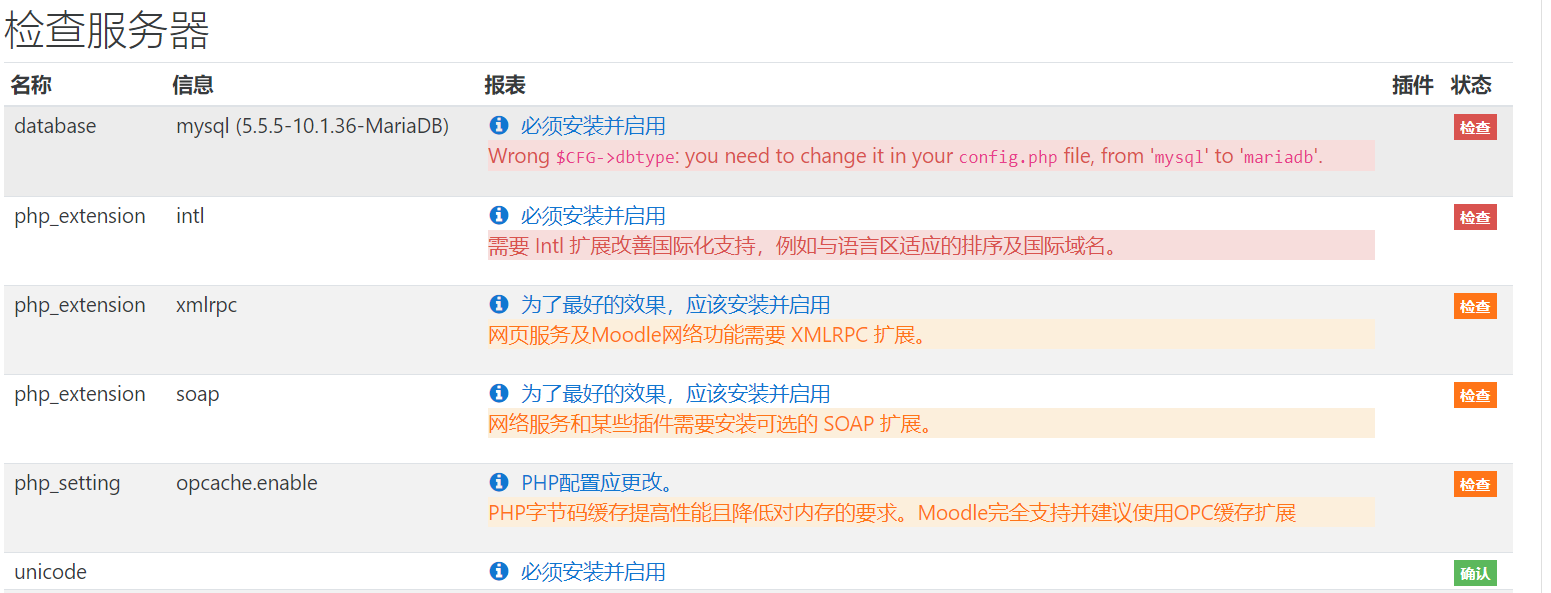
这里写下这些错误的解决方法(你也可以直接点击 后的文字查看官方的文档,此时你必须在第一步选择英文安装才能看到官方的英文文献),不想看的看我的解决方法:
2.1Wrong $CFG->dbtype: you need to change it in your config.phpfile, from 'mysql' to 'mariadb'.
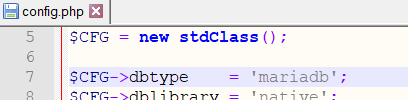
修改D:\xampp\htdocs\moodle\config.php
$CFG->dbtype = 'mariadb';
2.2需要 Intl 扩展改善国际化支持,例如与语言区适应的排序及国际域名。
(Intl extension is required to improve internationalization support, such as locale aware sorting and international domain names.)
网页服务及Moodle网络功能需要 XMLRPC 扩展。
(The XMLRPC extension is useful for web services and Moodle networking.)
网络服务和某些插件需要安装可选的 SOAP 扩展。
(Installing the optional SOAP extension is useful for web services and some plugins.)
修改D:\xampp\php\php.ini 将intl,xmlrpc,soap前面的分号去掉


2.3PHP字节码缓存提高性能且降低对内存的要求。Moodle完全支持并建议使用OPC缓存扩展
(PHP opcode caching improves performance and lowers memory requirements, OPcache extension is recommended and fully supported.)
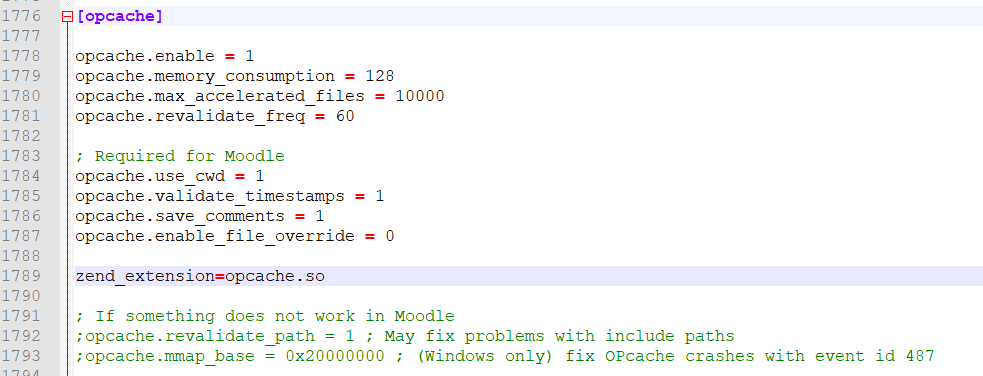
修改D:\xampp\php\php.ini 查找到[opcache]所在的位置添加以下代码
[opcache]
opcache.enable = 1
opcache.memory_consumption = 128
opcache.max_accelerated_files = 10000
opcache.revalidate_freq = 60

; Required for Moodle
opcache.use_cwd = 1
opcache.validate_timestamps = 1
opcache.save_comments = 1
opcache.enable_file_override = 0

zend_extension=opcache.so

; If something does not work in Moodle
;opcache.revalidate_path = 1 ; May fix problems with include paths
;opcache.mmap_base = 0x20000000 ; (Windows only) fix OPcache crashes with event id 487

; Experimental for Moodle 2.6 and later
;opcache.fast_shutdown = 1
;opcache.enable_cli = 1 ; Speeds up CLI cron
;opcache.load_comments = 0 ; May lower memory use, might not be compatible with add-ons and other apps.
然后,在php.ini的文档的最末尾添加
[ExtensionList]
zend_extension=php_opcache.dll

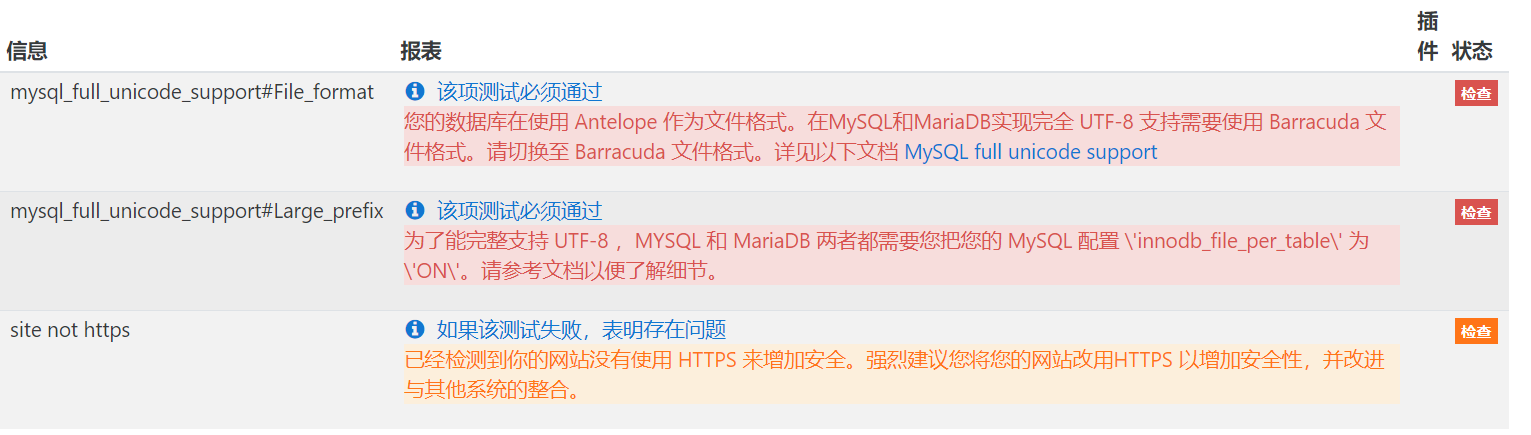
2.4您的数据库在使用 Antelope 作为文件格式。在MySQL和MariaDB实现完全 UTF-8 支持需要使用 Barracuda 文件格式。请切换至 Barracuda 文件格式。详见以下文档MySQL full unicode support(Your database uses Antelope as the file format. Full UTF-8 support in MySQL and MariaDB requires the Barracuda file format. Please switch to the Barracuda file format. See the documentation MySQL full unicode support for details.)
为了能完整支持 UTF-8 ,MYSQL 和 MariaDB 两者都需要您把您的 MySQL 配置 \'innodb_file_per_table\' 为 \'ON\'。请参考文档以便了解细节(For full support of UTF-8 both MySQL and MariaDB require you to change your MySQL setting 'innodb_large_prefix' to 'ON'. See the documentation for further details.)
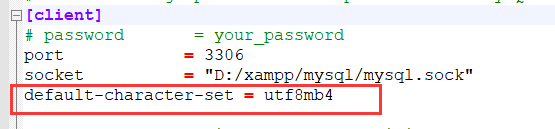
修改D:\xampp\mysql\bin|\my.ini 分别在对应位置添加下列代码
[client]
default-character-set = utf8mb4

[mysqld]
innodb_file_format = Barracuda
innodb_file_per_table = 1
innodb_large_prefix

character-set-server = utf8mb4
collation-server = utf8mb4_unicode_ci
skip-character-set-client-handshake

[mysql]
default-character-set = utf8mb4
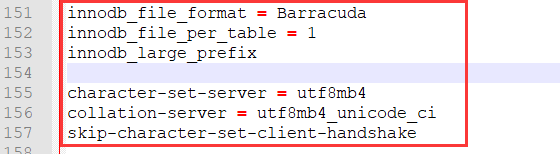

Antelope和Barracuda均为innodb存储引擎的文件格式,Antelope为默认格式,非压缩;Barracuda为压缩格式;两者主要的不同在于对大数据量的存储时所占用的空间差异。
若要使用innodb的压缩功能,则必须使用innodb_file_format=Barracuda,不然没有作用。
2.5已经检测到你的网站没有使用 HTTPS 来增加安全。强烈建议您将您的网站改用HTTPS 以增加安全性,并改进与其他系统的整合。(It has been detected that your site is not secured using HTTPS. It is strongly recommended to migrate your site to HTTPS for increased security and improved integration with other systems.)
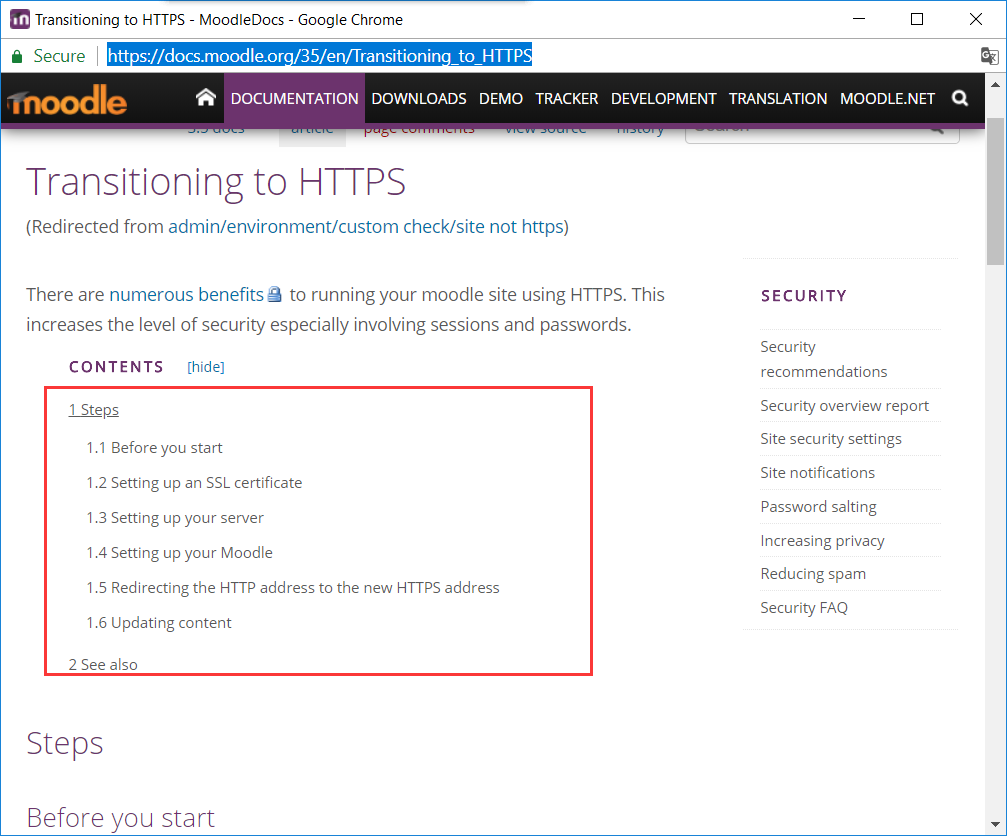
这个是让你安装SSL 证书,就是提供https的访问,我这里不需要,这个问题可以跳过不用修改,需要的查看 https://docs.moodle.org/35/en/Transitioning_to_HTTPS
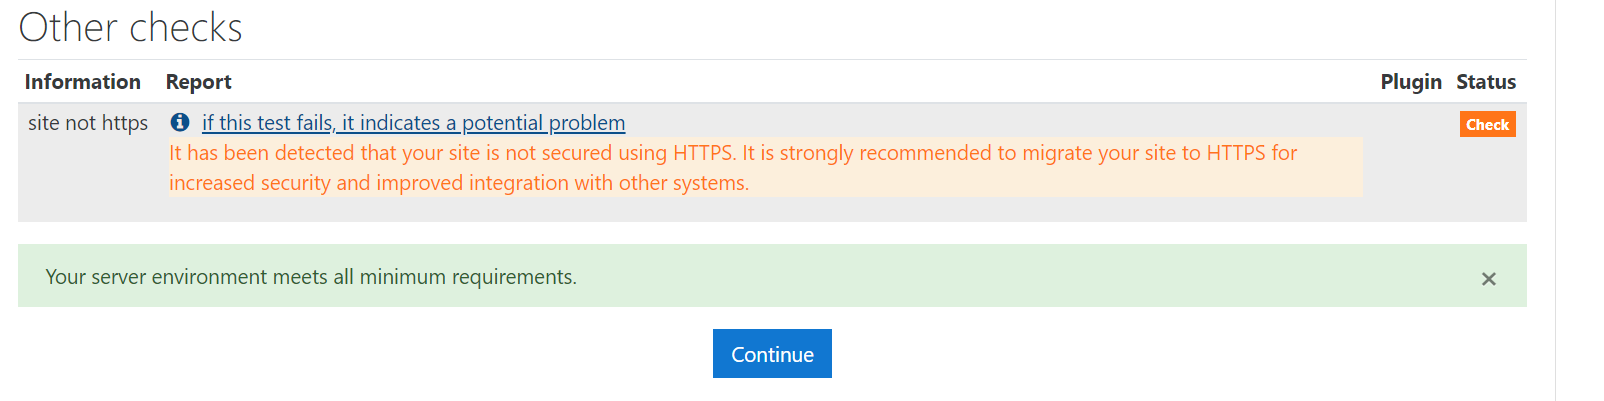
在解决完以上问题后,在xampp-control重启Apache和mysql服务,然后点击浏览器页面最下面的重新加载按钮
如果重新加载后出现以下画面表示可以继续
如果还是出现2.4的问题,那么你要执行以下命令:
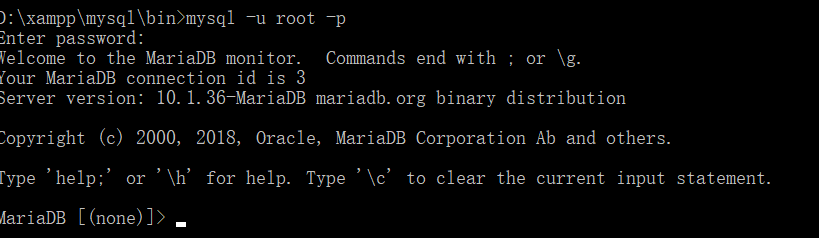
以管理员身份启动cmd,定位到D:\xampp\mysql\bin下
mysql -u root -p
表示以root身份登录到mysql
show global variables like "innodb_file_format%";
set global innodb_file_format=Barracuda;
set global innodb_large_prefix=ON;
 set global innodb_file_format_max=Barracuda;
show global variables like "innodb_file_format%";
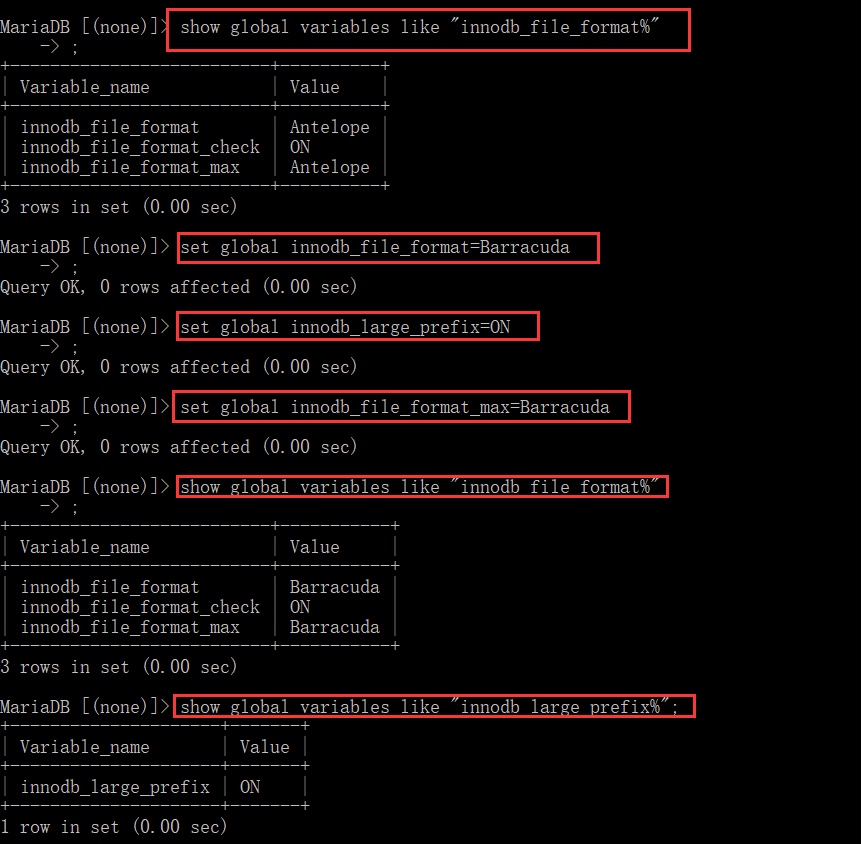
然后重新启动mysql服务,然后重新加载页面就可以。
点击继续安装:

出现这个界面,说明正在开始安装,你要等好一会。安装完后继续:

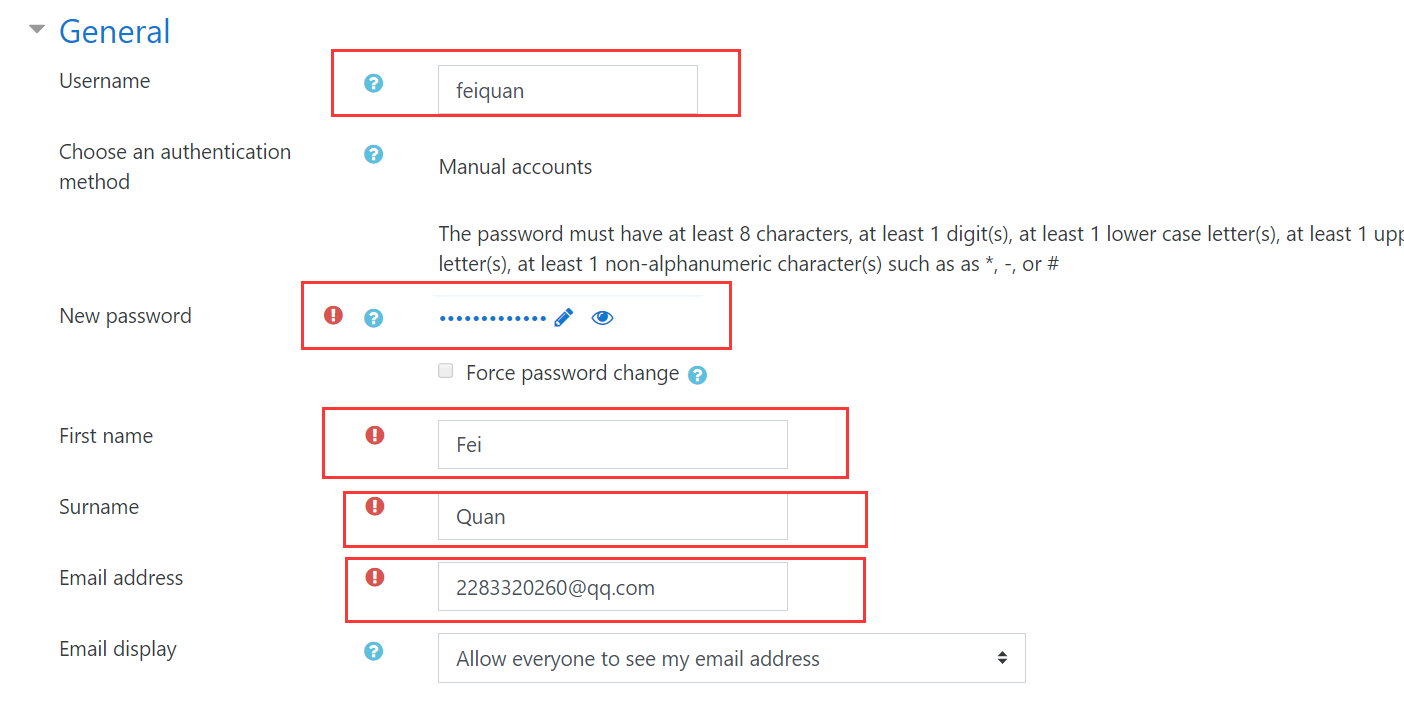
这几个红色的为必填项,是设置你一会要登录的管理员账号,一定要记住。其他信息自己填,不填也可以,然后继续。这里有点慢,大家要等一会。
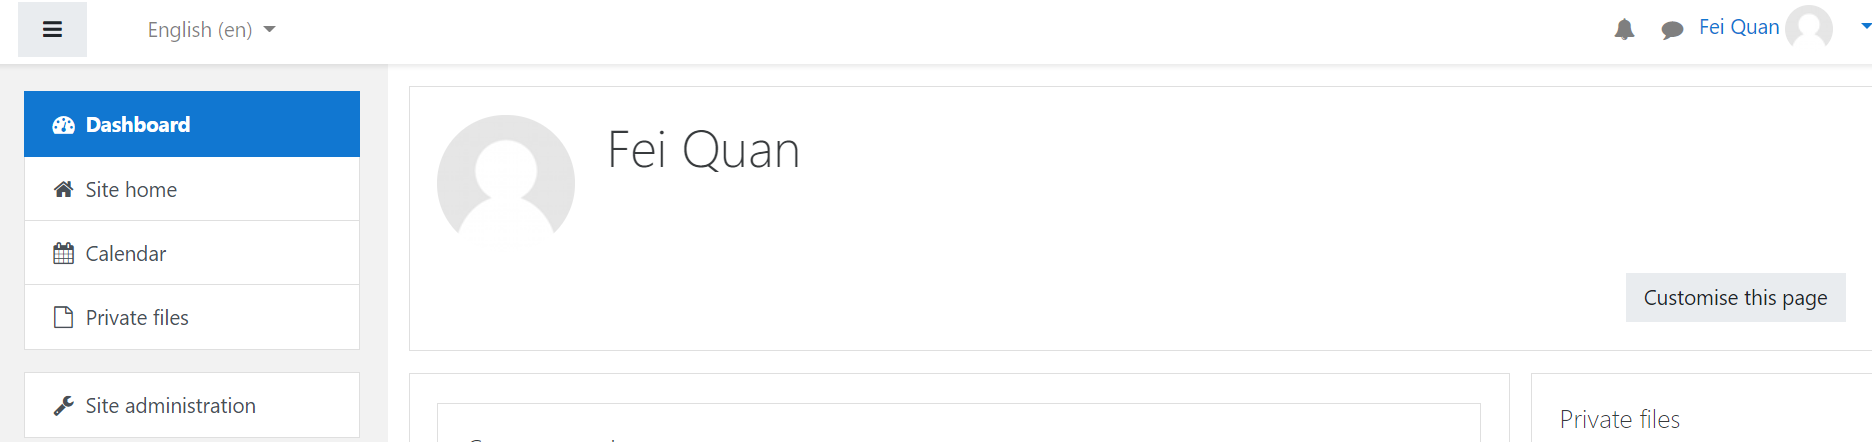
在这里等一会之后如果出现登录页面则表示正常。如果一直是空白页面你则需要进行以下步骤:
(1)在D:\xampp\php\php.ini文件中,
;open_basedir =
这句是注释掉的,改为(XAMPP集成安装路径)如下:
open_basedir = "D:\xampp"
open_basedir用来限制网站文件访问路径

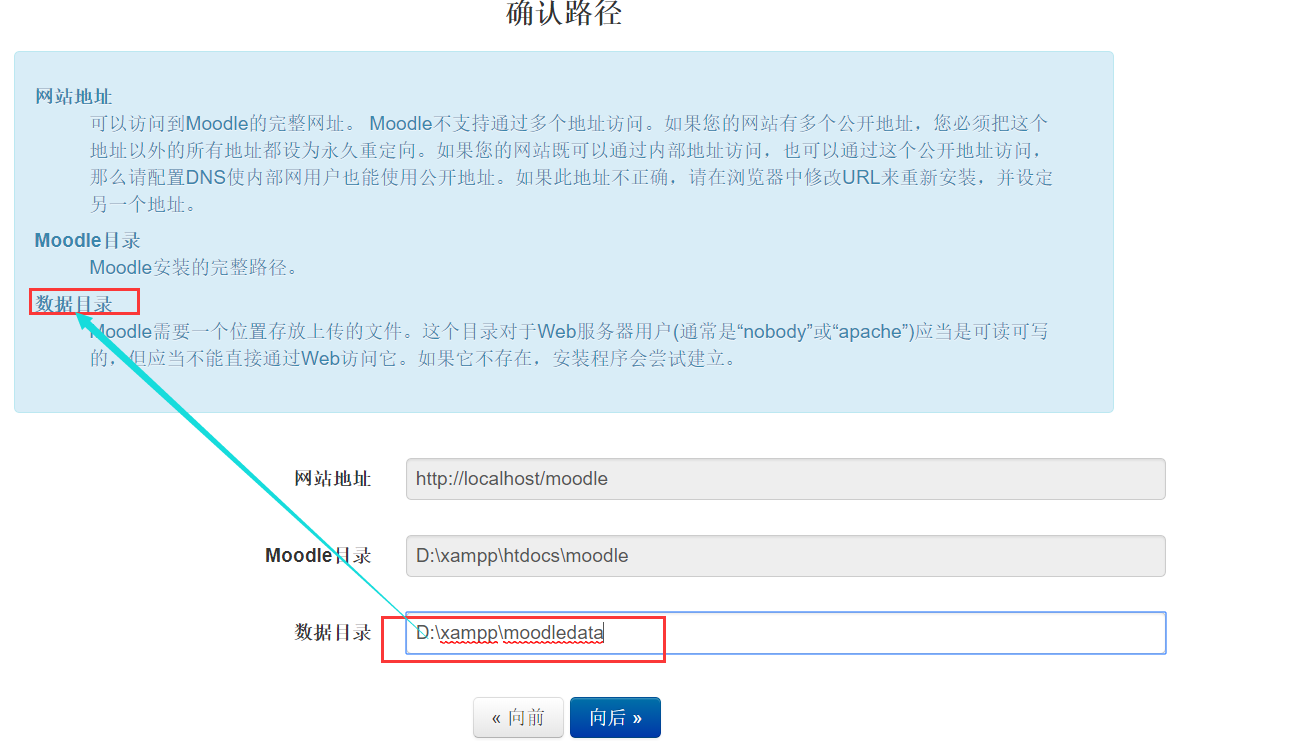
(2)D:\xampp\moodledata这个文件夹本来在Moodle外,需要将其移动到D:\xampp\htdocs\moodle下

修改在D:\xampp\htdocs\moodle\config.php文件中
$CFG->dataroot = 'D:\\xampp\\htdocs\\moodle\\moodledata';

这两步处理好后,在浏览器输入localhost/moodle/admin/index.php,访问不会空白了,但是出现如下问题:
Fatal error: Maximum execution time of 30 seconds exceeded in D:\xampp\htdocs\moodle\lib\classes\component.php on line 752
这是因为你的上面修改config.php中的$CFG->dataroot 后面的路径中丢了\\,这里是 \\ 不是 \,重新修改刷新后就会出现下面问题
Warning: is_readable(): open_basedir restriction in effect. File(/db/renamedclasses.php) is not within the allowed path(s): (D:\xampp) in D:\xampp\htdocs\moodle\lib\classes\component.php on line 1236
修改如下:
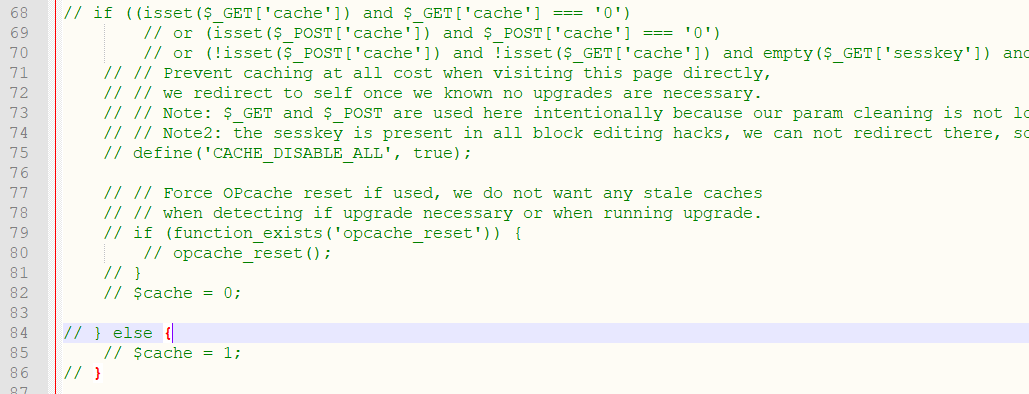
D:\xampp\htdocs\moodle\admin目录下index.php文件里有如下代码段:
if ((isset($_GET['cache']) and $_GET['cache'] === '0')
        or (isset($_POST['cache']) and $_POST['cache'] === '0')
        or (!isset($_POST['cache']) and !isset($_GET['cache']) and empty($_GET['sesskey']) and empty($_POST['sesskey']))) {
    // Prevent caching at all cost when visiting this page directly,
    // we redirect to self once we known no upgrades are necessary.
    // Note: $_GET and $_POST are used here intentionally because our param cleaning is not loaded yet.
    // Note2: the sesskey is present in all block editing hacks, we can not redirect there, so enable caching.
    define('CACHE_DISABLE_ALL', true);

    // Force OPcache reset if used, we do not want any stale caches
    // when detecting if upgrade necessary or when running upgrade.
    if (function_exists('opcache_reset')) {
        opcache_reset();
    }
    $cache = 0;

} else {
    $cache = 1;
}
这段代码为检测Moodle是否有缓存信息和关键数据保护检测。会根据不同的情况给cache字段赋值。
(1)将这段代码注释或删除掉,使得moodle平台在第一次安装后进入该页面不去考虑cache值的设置,而直接进入平台的主页面。
(2)在目录栏内输入localhost/moodle/index.php?cache=1。然后对平台进行操作时,数据库和缓存中会有新生成数据的写入。 之后再输入http://localhost/moodle/admin/user.php进入登陆界面
当然,你也可以换成中文。
(3)此时再在index.php文件中恢复上述注释或删除的代码段。再次打开Moodle平台时,检测机制会顺利的通过,而不会出现因检测语句冗余而产生的页面重定向循环问题。
至此,Moodle安装成功!!!
最后,提供Moodle官网下载插件的链接:
https://moodle.org/plugins
插件安装方法:
https://docs.moodle.org/all/zh/index.php?title=%E5%AE%89%E8%A3%85%E6%8F%92%E4%BB%B6&variant=zh
参考网址:
https://blog.csdn.net/shiyongchun8212/article/details/83415585
https://blog.csdn.net/zcyzsy/article/details/52012664
https://blog.csdn.net/wll_1017/article/details/54860881
https://www.jb51.net/article/52530.htm
标签:
版权申明:本站文章部分自网络,如有侵权,请联系:west999com@outlook.com
特别注意:本站所有转载文章言论不代表本站观点,本站所提供的摄影照片,插画,设计作品,如需使用,请与原作者联系,版权归原作者所有

下一篇:Swoole 创建服务
- 分享PHP+MySQL投票系统的设计和实现 2019-11-21
- 详解PHP 文件系统 2019-11-19
- windows环境下php配置memcache的具体操作步骤 2019-10-25
- php根据操作系统转换文件名大小写的方法 2019-10-12
- windows下apache搭建php开发环境 2019-09-23
IDC资讯: 主机资讯 注册资讯 托管资讯 vps资讯 网站建设
网站运营: 建站经验 策划盈利 搜索优化 网站推广 免费资源
网络编程: Asp.Net编程 Asp编程 Php编程 Xml编程 Access Mssql Mysql 其它
服务器技术: Web服务器 Ftp服务器 Mail服务器 Dns服务器 安全防护
软件技巧: 其它软件 Word Excel Powerpoint Ghost Vista QQ空间 QQ FlashGet 迅雷
网页制作: FrontPages Dreamweaver Javascript css photoshop fireworks Flash
