
深入剖析Tomcat(2)
2019-01-16 05:50:52来源:博客园 阅读 ()

之前根据第一章的内容和代码写了一个博客,发现在看这个书的时候写博客和跑代码是比纯看书收获大的多得多的,因此还是很开心自己没有懒惰。
在看第二章的时候,我选择了直接看代码,这样就相当于同时做了复习和预习,然后看第二章的时候就可以跳过很多已知内容了。
第二章一共有两个例程,主要是引入了java包里面的Servlet,和门面Facade设计模式。
我们先看第二章的HttpServer1,这个程序中引入了Servlet。和第一章的服务端程序相比,这里多了一个功能,除了可以访问http://localhost:8080/index.html之外,还可以访问http://localhost:8080/servlet/primitiveServlet 来请求一个具体的servlet,然后返回那个servlet里面的service函数里面的内容。
我们还是从main函数入口看起。

这里是和第一章中HttpServer的主要区别。先看else的部分,比较简单。

这个StaticResourceProcessor类,十分简单,就是包装了request和response,然后调用response的sendStaticResource而已。
然后看一些response方法,主要的区别就是实现了ServletResponse接口,所有的接口方法返回null,只实现了getWriter。
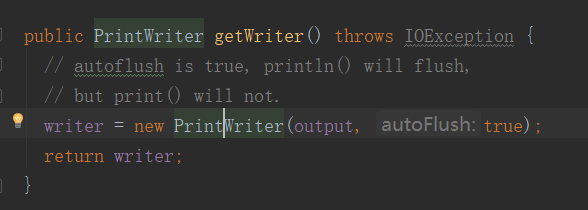
这里返回了一个PrintWriter,并制定了autoFlush为true(这个参数会令任何println的调用都会刷新输出,但是print则不会)。这个printWriter是一个字符打印流的作用。
我们再来看main中的if里面的内容,判断如果解析出来的uri是以“/servlet”开头的话就会进入这个代码块。
这里的ServetProcessor1比之前的StaticResourceProcessor稍微麻烦一些。主要方法是process方法:
public void process(Request request, Response response) {

  String uri = request.getUri();
  String servletName = uri.substring(uri.lastIndexOf("/") + 1);
  URLClassLoader loader = null;

  try {
    // create a URLClassLoader
    URL[] urls = new URL[1];
    URLStreamHandler streamHandler = null;
    File classPath = new File(Constants.WEB_ROOT);
    // the forming of repository is taken from the createClassLoader method in
    // org.apache.catalina.startup.ClassLoaderFactory
    String repository = (new URL("file", null, classPath.getCanonicalPath() + File.separator)).toString() ;
    // the code for forming the URL is taken from the addRepository method in
    // org.apache.catalina.loader.StandardClassLoader class.
    urls[0] = new URL(null, repository, streamHandler);
    loader = new URLClassLoader(urls);
  }
  catch (IOException e) {
    System.out.println(e.toString() );
  }
  Class myClass = null;
  try {
    myClass = loader.loadClass(servletName);
  }
  catch (ClassNotFoundException e) {
    System.out.println(e.toString());
  }

  Servlet servlet = null;

  try {
    servlet = (Servlet) myClass.newInstance();
    servlet.service((ServletRequest) request, (ServletResponse) response);
  }
  catch (Exception e) {
    System.out.println(e.toString());
  }
  catch (Throwable e) {
    System.out.println(e.toString());
  }

}
这个方法应该是这个程序的核心了,用到了url类加载器来加载一个servlet。我们debug启动这个程序,然后直接在这个方法里面打一个断点,一步一步走就可以看到这个方法是怎么通过一个“/servlet/primitiveServlet” uri得到一个PrimitiveServlet类实例的。
重点看try里面的地方:

新建一个URL[]数组来给url类加载器使用,新建一个URLStreamHandler给URL的构造函数使用,然后找到存放资源的目录。

Constants常数类里面的WEB_ROOT可以直接找到真实的一个webroot文件夹。然后通过一个URL类的构造函数生成一个路径
String repository = (new URL("file", null, classPath.getCanonicalPath() + File.separator)).toString() ;
这个函数会给传入的classPath前面加上file:,然后最后面加上“\”。
然后通过URL的另一个构造函数生成一个URL实例。
这个构造函数的定义是
public URL(URL context, String spec, URLStreamHandler handler)
上面那个构造函数的定义是
public URL(String protocol, String host, String file)
因此我们不能在调用的时候传入,URL(null, spec, null) 这样会找不到正确的构造函数,因此这里一开始新建的URLStreamHandler为null就有用了。
最后生成PrimitiveServlet类的类加载器。
然后我们看第二个程序HttpServer2
这里的主要的不同就是在ServletProcessor的process方法里面,process方法用了requestFacade和responseFacade。
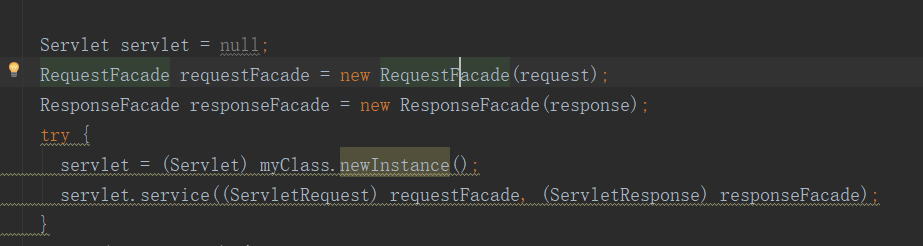
(其实我没有完全懂得为什么要用外观类,按照书里面的说法)这里主要是为了安全性考虑,因为Request和Response里面的方法都是public方法,如果有懂容器机制的人通过向下转型来获取到了Request和Response类,那他们就会调用到里面的方法,因此我们需要将他们隐藏起来。这里就通过外观类来将Request和Response分别作为成员变量赋给外观类,然后再在外观类里面调用Request和Response里面的方法以达到安全的目的。
原文链接:https://www.cnblogs.com/kobebyrant/p/how_tomcat_works_2.html
如有疑问请与原作者联系
标签:
版权申明:本站文章部分自网络,如有侵权,请联系:west999com@outlook.com
特别注意:本站所有转载文章言论不代表本站观点,本站所提供的摄影照片,插画,设计作品,如需使用,请与原作者联系,版权归原作者所有

上一篇:git常用命令
下一篇:DES详解(Java实现)
- java环境教程:Tomcat下载,安装,设置为Windows服务,启动 2020-06-09
- 深入解析ThreadLocal和ThreadLocalMap 2020-06-08
- 深入理解:设计模式中的七大设计原则 2020-06-07
- 深入浅出 Java 类加载机制! 2020-06-05
- Idea实现SpringBoot外置Tomcat的Web项目热部署(包含静态文 2020-06-04
IDC资讯: 主机资讯 注册资讯 托管资讯 vps资讯 网站建设
网站运营: 建站经验 策划盈利 搜索优化 网站推广 免费资源
网络编程: Asp.Net编程 Asp编程 Php编程 Xml编程 Access Mssql Mysql 其它
服务器技术: Web服务器 Ftp服务器 Mail服务器 Dns服务器 安全防护
软件技巧: 其它软件 Word Excel Powerpoint Ghost Vista QQ空间 QQ FlashGet 迅雷
网页制作: FrontPages Dreamweaver Javascript css photoshop fireworks Flash
