
��ά�Զ���֮ϵͳ��װ
2018-07-17 03:55:45��Դ������ �Ķ� ()

��������ϵͳ��װ��������anaconda�Զ�����װϵͳ�����������̺�U��DHCP����PXE��װϵͳ����cobbler��ҵ��Ӧ��
��װ����
? CentOSϵͳ��װ
ϵͳ�������̣�
bootloader-->kernel(initramfs)-->rootfs-->/sbin/init
? anaconda: ϵͳ��װ����
gui��ͼ�δ���
tui: ����ͼ�ο�curses���ı�����
��װ������������ 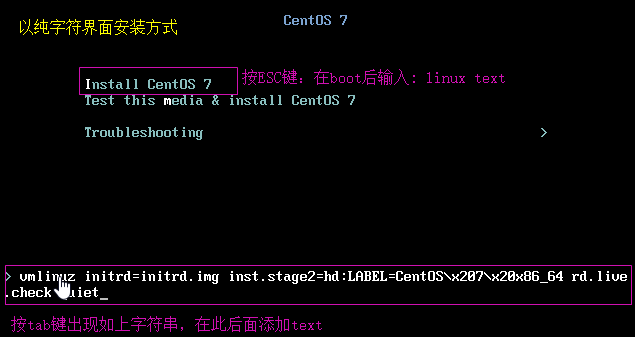
? MBR��isolinux/boot.cat
? stage2: isolinux/isolinux.bin
? �����ļ���isolinux/isolinux.cfg
ÿ����Ӧ�IJ˵�ѡ�
�����ںˣ�isolinuz/vmlinuz
���ں˴��ݲ�����append initrd=initrd.img ...
? װ�ظ��ļ�ϵͳ��������anaconda
Ĭ������GUI�ӿ�
������ʽָ��ʹ��TUI�ӿڣ����ں˴���text��������
(1)��tab��,�ں�������text
(2)��ESC����boot: linux text �����ַ���ʽ��װϵͳ������Ҫͼ�ν��桰
�ֶ���װ����
anaconda��������
Anaconda��װϵͳ�ֳ������Σ�
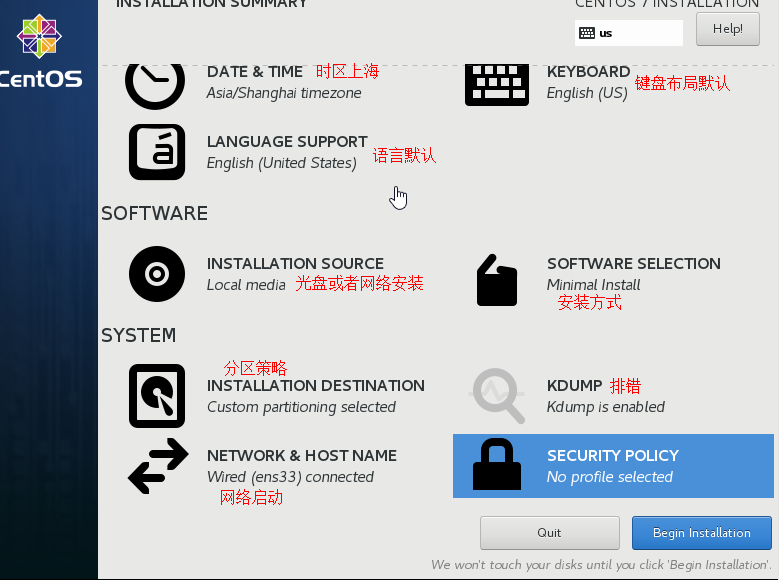
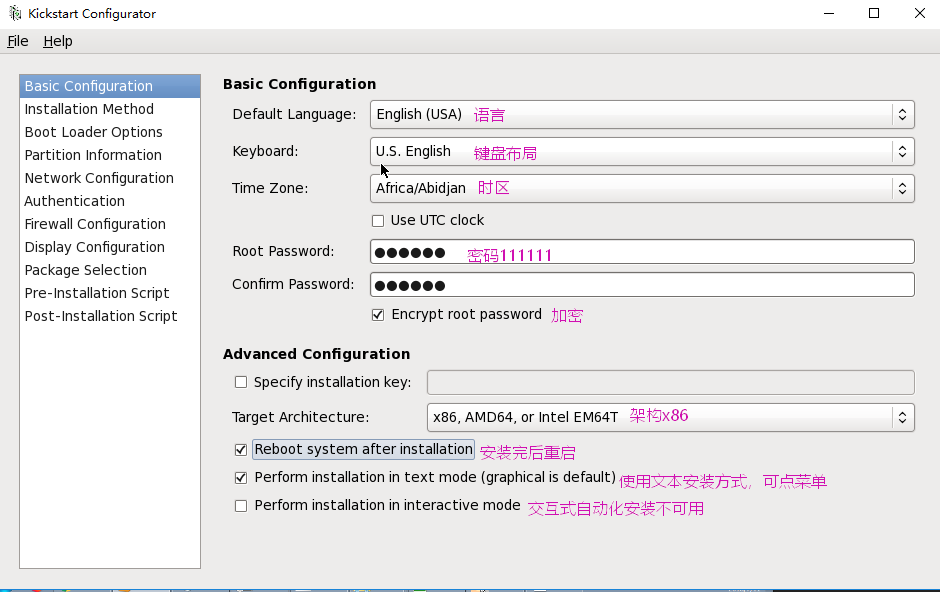
1����װǰ���ý�
- ��װ����ʹ�õ�����
- ��������
- ��װĿ��洢�豸
- Basic Storage�����ش���
- �����豸��iSCSI
- �趨������
- ��������ӿ�
- ʱ��
- ����Ա����
- �趨������ʽ��MBR�İ�װλ��
- ����һ����ͨ�û�
- ѡ��Ҫ��װ�ij����
2����װ��
- ��Ŀ����̴���������ִ�и�ʽ��������
- ��ѡ���ij������װ��Ŀ��λ��
- ��װbootloader��initramfs
3��ͼ��ģʽ�״�����
- iptables
- selinux����ȫ���ƣ�
- core dump
anaconda
anaconda����װϵͳ��Ĭ��ΪGUI���棬�������ʹ��ks�Զ�Ӧ��װ�Ļ�����ʹ��TUI��������װ���ڰ�װ�����������ǿ���esc�����Լ��ֶ�ָ����װ����ѡ��anacondaѡ�
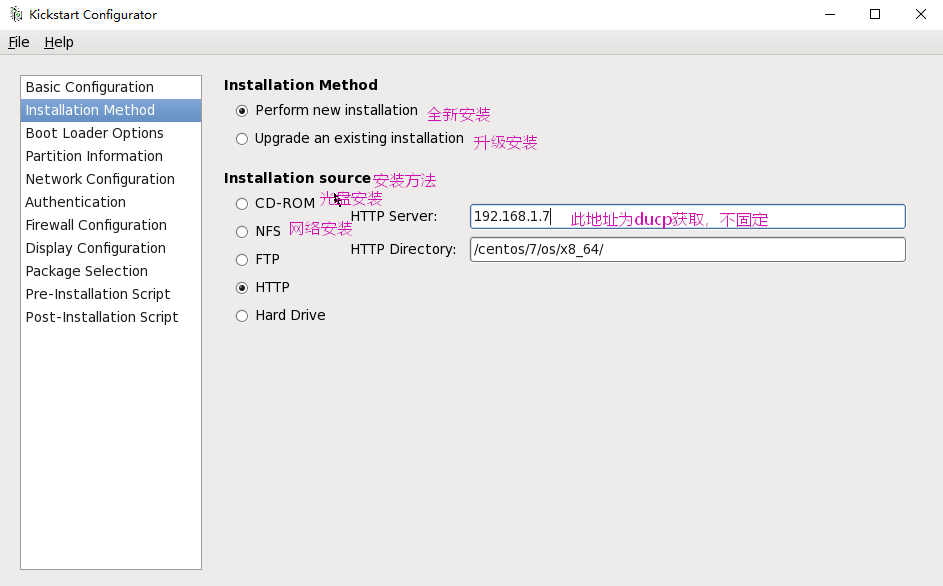
1��boot��linux askmethod ���Ժ�İ�װ���ֶ�ѡ��װԴ
���ع��̡�Ӳ�̡�NFS��FTP��HTTP
2��linux dd ����������
3��linux ks=xxx ָ����װks�ļ�
- DVD drive: ks=cdrom:/PATH/TO/KICKSTART_FILE
- Hard drive: ks=hd:device:/directory/KICKSTART_FILE
- HTTP server: ks=http://host:port/path/to/KICKSTART_FILE
- FTP server: ks=ftp://host:port/path/to/KICKSTART_FILE
- HTTPS server: ks=https://host:port/path/to/KICKSTART_FILE
- NFS server:ks=nfs:host:/path/to/KICKSTART_FILE
4��linux nonet ����������
5��linux noprobe ��װ��������Ӳ���豸
6��linux rescue �����Ԯģʽ
7��linux ������װ
8��local ��Ӳ������
9��linux text ���ַ����氲װ
10��linux ip={DHCP | 192.168.0.1} netmask=255.255.255.0 gateway=192.168.0.1 dns=114.114.114.114 ks=http://192.168.0.1/ks.cfg ����IP���������ȡks�ļ�
11��linux ip={DHCP | 192.168.0.1} netmask=255.255.255.0 gateway=192.168.0.1 dns=114.114.114.114 repo=http://192.168.0.1 ����IP��ַ��ָ����repoԴ��װ
- ip=IPADDR
- netmask=MASK
- gateway=GW
- dns=DNS_SERVER_IP
- ifname=NAME:MAC_ADDR
12��linux vnc vncpassword="PASSWORD" ʹ��vnc���ð�װ����
�ڹ����µ�isolinux/�ļ���Ϊanaconda�Ĺ���Ŀ¼�ļ����λ��
# ls -1 isolinux/ boot.cat ģ��mbr�ļ� boot.msg grub.conf grub�������ļ� initrd.img ramdisk�ļ� isolinux.bin grub�ĵڶ��� isolinux.cfg �����ļ��������˵������ļ��� memtest �ڴ�����ļ� splash.jpg ����ͼƬ TRANS.TBL vesamenu.c32 ����������ͼ�ν���˵���� vmlinuz �ں��ļ�
�����˵��������ļ�isolinux/isolinux.cfg
# cat isolinux/isolinux.cfg default vesamenu.c32 �ṩͼ�β˵���� #prompt 1 timeout 600 �˵�ѡ��ʱʱ�� display boot.msg menu background splash.jpg ����ͼƬ menu title Welcome to CentOS 6.9! �˵��Ϸ���ʾ��Ϣ menu color border 0 #ffffffff #00000000 menu color sel 7 #ffffffff #ff000000 menu color title 0 #ffffffff #00000000 menu color tabmsg 0 #ffffffff #00000000 menu color unsel 0 #ffffffff #00000000 menu color hotsel 0 #ff000000 #ffffffff menu color hotkey 7 #ffffffff #ff000000 menu color scrollbar 0 #ffffffff #00000000 label linux һ���˵� menu label ^Install or upgrade an existing system menu default Ĭ��ѡ�� kernel vmlinuz append initrd=initrd.img ���ں˴��ݲ���
ʵ�飺������ͼ�ν��棬��������
1�����yum Դ����װ��yum grouplistall "gonme desktop" yum grouplist:�鿴����
2��yum install bash-completion �������С����װ��ϵͳ��װ��ȫ�� �� rmp -qa "bash" ���ҳ�
����Ѿ�װ�ã���exit���µ�¼��ֻ�д��µ�¼װ�İ�����Ч
3��systemctl isolate graphical.target --------- ����init5
4���Ŀ�����������ģʽ��

kickstart�Զ�Ӧ���ļ�
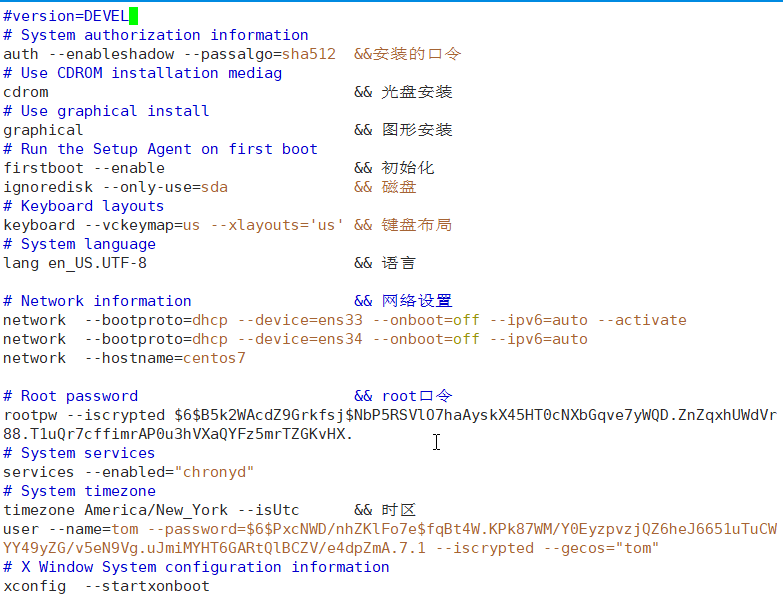
kickstartΪanaconda��װϵͳ�������Զ�Ӧ�������úõ�ѡ�ʵ������ֵ�ذ�װϵͳ��
���Ȱ������ֶ���װʱ����Щ���ã�����������ԣ�����֮��İ�װ�İ�����Ӧ���ļ��У���װ��ȡӦ���ļ������Զ���װ��
ks�ļ���ʽ��������
�������
---����ָ��---
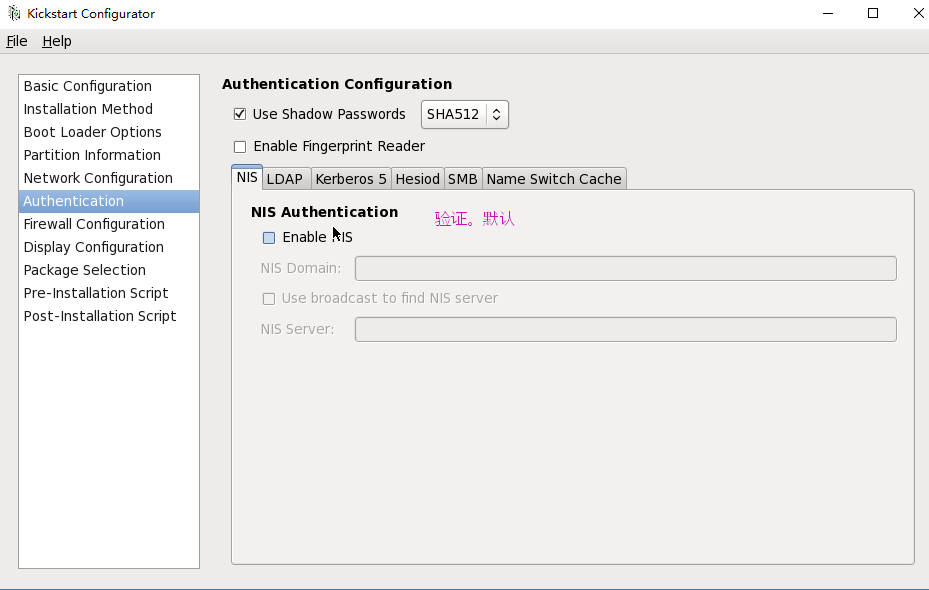
authconfig: ��֤��ʽ����
����authconfig --useshadow --passalgo=sha512
bootloader��bootloader�İ�װλ�ü��������
���� bootloader --location=mbr --driveorder=sda �C append="crashkernel=auto rhgb quiet"
keyboard
lang
timezone
rootpw
authconfig --enableshadow
bootloader --location=mbr --password=******
driverdisk ָ��������
firewall --enable --ssh,--disabled
firstboot --disbaled
halt ��ɺ�ػ�
reboot ��ɺ�����
text|graphical(default) �ı�|ͼ��
key --skip ������װ����,������rhel�汾
keyboard: �趨��������
lang: ��������
part: ��������
rootpw: ָ��root������
timezone: ʱ��
---��ѡ����---
clearpart --all,--linux,--none(default) --initlabel(��ʼ���������)
autopart �Զ�����
����������ignoredisk --drives=drive1,drive2����Ӳ��
�������� autostep ������ѡ���Ĭ��ֵ
�������� part or partition /boot --fstype ext4 --size=200
�������� install OR upgrade
����������text: �ı���װ����
����������network
����������firewall
����������selinux
����������halt
�������� poweroff
����������reboot
����������repo
����������user����װ��ɺ�Ϊϵͳ�������û�
����������url: ָ����װԴ
����������key �Cskip ������װ����,������rhel�汾

[root@centos7 ~]# systemctl start httpd ����http����
[root@centos7 ~]# ss -ntl 80�˿ڴͿ��Է�����
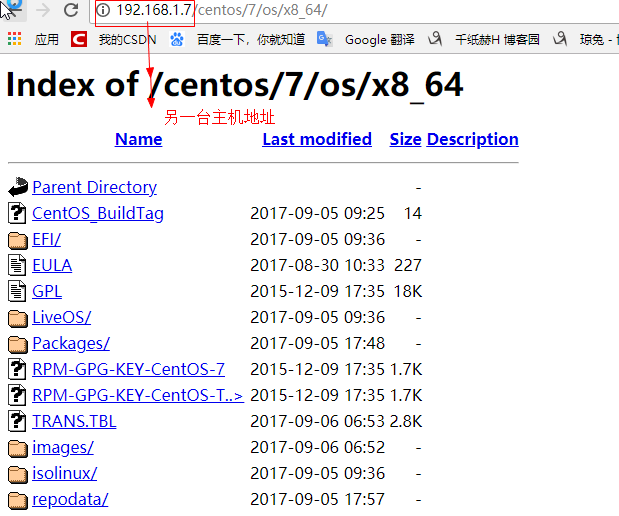
[root@centos7 ~]# cd /var/www/html Ĭ�ϴ��ҳ����ļ� [root@centos7 /var/www/html]# ls [root@centos7 /var/www/html]# mkdir -pv centos/7/os/x8_64/ ģ�°�����yumԴ�Դ����ļ��з�ʽ��centos���̷ŵ����ҳ���� mkdir: created directory ��centos�� mkdir: created directory ��centos/7�� mkdir: created directory ��centos/7/os�� mkdir: created directory ��centos/7/os/x8_64/�� [root@centos7 /var/www/html]# mount /dev/sr0 centos/7/os/x8_64/ ���ع��̵����centos/7/os/x8_64/Ŀ¼�� mount: /dev/sr0 is write-protected, mounting read-only [root@centos7 /var/www/html]# ls centos
yumԴ���ɣ�


[root@centos7 ~/.ssh]# ssh-keygen ��centos7��������key Generating public/private rsa key pair. Enter file in which to save the key (/root/.ssh/id_rsa): Enter passphrase (empty for no passphrase): Enter same passphrase again: Your identification has been saved in /root/.ssh/id_rsa. Your public key has been saved in /root/.ssh/id_rsa.pub. The key fingerprint is: SHA256:9xImk70qDENHI8D4aJlqNewV2o3/RUGm7njgz6ZIBqs root@centos7 The key's randomart image is: +---[RSA 2048]----+ | o.. .o | |. . ..o o. | | o+ oo+. . . | |.+.=.+...o . | |o ooo...S.* | |.. .= ..+= = | |. . * o.o+ . | | . o + ++ . | | E . o+o | +----[SHA256]-----+ [root@centos7 ~/.ssh]# cat id_rsa.pub �鿴��Կ�ļ� ssh-rsa AAAAB3NzaC1yc2EAAAADAQABAAABAQD3v5+ZpK3jGAUGv5Yu4tOvPqpftREzI1tzXPjQPSE20mFhFH8H
45DD01IsvcTtoBj6LFQyjJ8T6FPvtBffdAsCfFeBirBy3OASgHn4+6Y6VihSiGoKt0cqVMFCpg136InI9995tCDx
iLA6orMd+VJ4YPXs5IdP9a+xqJTD9WN2YdCttRsWujkUVQEfTJprSFy21xNTsvyTvsiFonta9GuC/72jd+Y8Wr/Y
z4cMHVpEBgRXWYXTVCxNzWOIIpJivVZFXr/sa/kf5v14TDeEJwomeJhwZJ211AsY46f/XWrXeIBvLNZ2Ee36xWOe
I+bqTUlpvR0nqjetF9DaGNWXAitV root@centos7

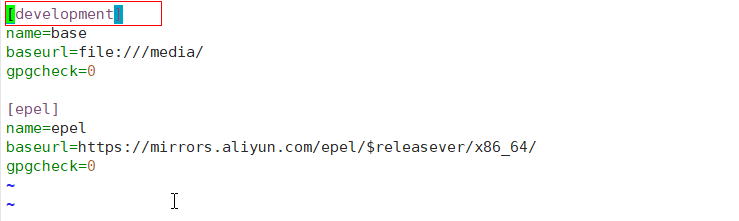
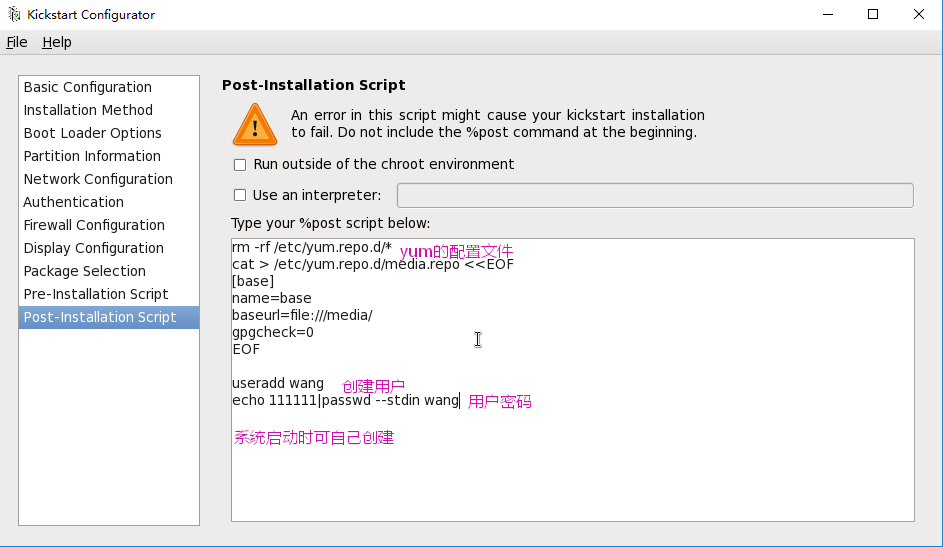
platform=x86, AMD64, or Intel EM64T
#version=DEVEL
# Firewall configuration
firewall --disabled
# Install OS instead of upgrade
install
# Use network installation
url --url="http://192.168.1.6/centos/6/os/x86_64/"
# System authorization information
auth  --useshadow  --passalgo=sha512
# Use graphical install
graphical
firstboot --disable
# System keyboard
keyboard us
# System language
lang en_US
# SELinux configuration
selinux --disabled
# Installation logging level
logging --level=info

# System timezone
timezone  Africa/Abidjan
# Network information
network  --bootproto=dhcp --device=eth0 --onboot=on
# System bootloader configuration
bootloader --location=partition
# Clear the Master Boot Record
zerombr
# Partition clearing information
clearpart --all --initlabel
%post
rm -rf /etc/yum.repo.d/*
cat > /etc/yum.repo.d/media.repo <<EOF
[base]
name=base
baseurl=file:///media/
gpgcheck=0
EOF

useradd wang
echo 111111|passwd --stdin wang
%end

%packages
@base
%end
ks�ļ���LVM����������ʽ
part /boot --fstype xfs --size=200 --ondisk=sda
part pv.2 --size=0 --grow --ondisk=sda
volgroup myvg --pesize=4096 pv.2
logvol / --fstype xfs --name=lv_root --vgname=myvg --size=10240 --grow
logvol swap --fstype swap --name=lv_swap --vgname=myvg --size=1024 --grow --maxsize=2048
ks�ļ���ʹ��ϵͳ�Զ�������ʽ
# Partition clearing information
clearpart --all --initlabel
autopartc
ʵ�飺��centos7��ͨ��Ӧ���ļ����ftp ����ʵ���Զ�����װ
1��yum install vsftpd systemctl start vsftpd �����÷��� ��װftp����
�����Զ������Ŀ¼��������Ӧ���ļ���
2��cd /var/ftp/pub �����Զ������Ŀ¼��������Ӧ���ļ��У�
3��[root@centos7 /var/ftp/pub]# mkdir centos7 �������ļ���
4��[root@centos7 /var/ftp/pub]# mount /dev/sr0 centos7/ �����̹��ص�
centos7��
5��[root@centos7 /var/ftp/pub]# setenforce 0 �رհ�ȫ����
6������

7��[root@centos7 /var/ftp/pub]# mv /root/ks7.cfg ��������Ӧ���ļ�
���Ƶ���ǰĿ¼�£����ҽ�����
#version=DEVEL
# System authorization information
auth --enableshadow --passalgo=sha512
# Use CDROM installation media
url --url=ftp//192.168.1.7/pub/centos7/ yum Դ��·��
# Use graphical install
graphical graphical��ͼ�ΰ�װ����Ϊtext���ı���װ��
# Run the Setup Agent on first boot
firstboot --enable
ignoredisk --only-use=sda
# Keyboard layouts
keyboard --vckeymap=us --xlayouts='us'
# System language
lang en_US.UTF-8
# Network information
network --bootproto=dhcp --device=ens33 --onboot=off --ipv6=auto --activate
network --bootproto=dhcp --device=ens33--onboot=on --ipv6=auto
network --hostname=centos7 ������Ϊon��������������
# Root password
rootpw --iscrypted $6$B5k2WAcdZ9Grkfsj$NbP5RSVlO7haAyskX45HT0cNXbGqve7yWQD.ZnZ
qxhUWdVr88.T1uQr7cffimrAP0u3hVXaQYFz5mrTZGKvHX.
# System services
services --enabled="chronyd"
selinux --disabled ���ð�ȫ����
firewall --disabled ���÷���ǽ
# System timezone
timezone America/New_York --isUtc
user --name=tom --password=$6$PxcNWD/nhZKlFo7e$fqBt4W.KPk87WM/Y0EyzpvzjQZ6heJ6
651uTuCWYY49yZG/v5eN9Vg.uJmiMYHT6GARtQlBCZV/e4dpZmA.7.1 --iscrypted --gecos="tom"
# X Window System configuration information
xconfig --startxonboot
reboot
# System bootloader configuration
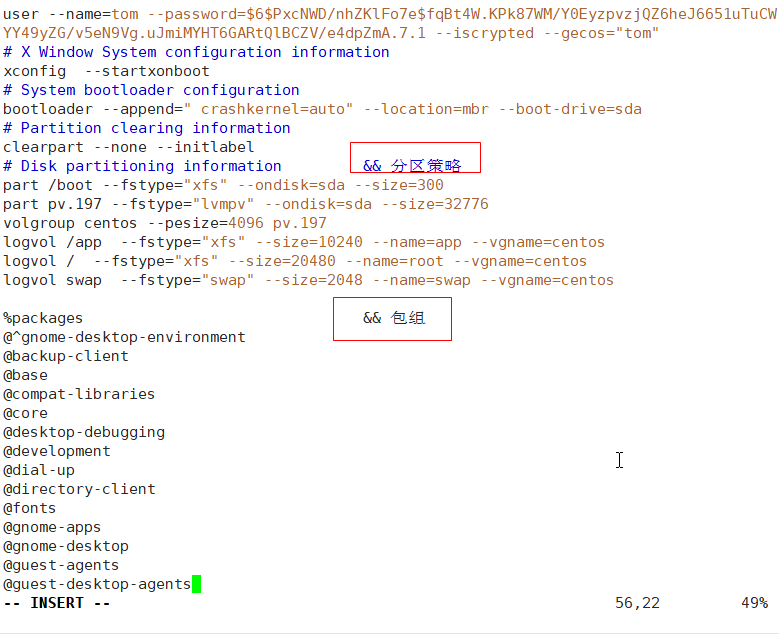
bootloader --append=" crashkernel=auto" --location=mbr --boot-drive=sda
# Partition clearing information
clearpart --all --initlabel
zerombr �����Ӳ���������Ϣ
eula --agreed �ڰ�װ������ʱ�������ɣ���Ϊͬ��
# Disk partitioning information
part /boot --fstype="xfs" --ondisk=sda --size=300
part pv.197 --fstype="lvmpv" --ondisk=sda --size=32776
volgroup centos --pesize=4096 pv.197
logvol /app --fstype="xfs" --size=10240 --name=app --vgname=centos
logvol / --fstype="xfs" --size=20480 --name=root --vgname=centos
logvol swap --fstype="swap" --size=2048 --name=swap --vgname=centos
%packages
@base
@core
antofs
%end
%rost
systrmctl enable antofs ����������
rm -rf /etc/yum.repo.d/* �ű��ļ�
cat > /etc/yum.repo.d/media.repo <<EOF
[base]
name=base
baseurl=file:///media/
gpgcheck=0
EOF
useradd wang �����û�
echo 111111|passwd --stdin wang ��������
mkird /root/.ssh ����Kry��¼
echo 'ssh-rsa AAAAB3NzaC1yc2EAAAADAQABAAABAQC+JozTFawnUT1125IPO6C3NIwMuEsb
rKngSIiF9RsiLZ9Kn2kEyZDVtAXD0IGhXrWFqWW8MEPIOxVQwWVsUDvC2gcmqoh5QRxlrsPzZaCj
/z5O7Igqj1bu7HrkQGtBSk+UgxFrCxl8WnhKNssz6OKva3UpPcqmiwvGjEPWbNZrcufW7d2JzU+B
xHoO/748GADIEhYOfxzlRopqNrYtQTlNmx+3fXwdBGJTJfYODJF8zu9SGxnvRYnD/i78pRc7Qv3/
/fzH1AYlML2wdshMzIYQp9to6BGDhqwuN8MO95gTU8yI9Ndwsf7fZhNK8WSzbOWjPwEFgaKAd8DU
95PLG+8D root@centos7' > root/.ssh/authorized_keys
8��[root@centos7 /var/ftp/pub]# ls
centos7 ks7.cfg
[root@centos7 /var/ftp/pub]# chmod +r ks7.cfg �Ϳ�������ҳ�ϴ��ļ���
8���ù�����������

���������Ѿ���һ��ks�ļ��ˣ���������Ҫ��ks�ļ����뵽�����ļ�����ʵ���Զ���װ���Ͳ���ÿ���ù������������뿪ks ..........һ���ַ��ˡ�
1������װ�ļ�
[root@centos6 /data]# mkdir boot
[root@centos6 /data]# cp -r /media/isolinux/ /data/boot
[root@centos6 /data]# mkdir ksdir
[root@centos6 /data]# cp /root/ks6.cfg  ksdir/
2���������ļ�
label linux
menu label ^Auto Install an system
kernel vmlinuz
append initrd=initrd.img ks=cdrom:/ksdir/ks6.cfg Ӧ���ļ�
label vesa
menu label Install ^Manual centos
kernel vmlinuz dhcp Ĭ�ϻ�ȡ��ַ
append initrd=initrd.img reop=http://192.168.1.12/centos/6/os/x86_64/ �ֹ���װ
label local
menu label Boot from ^local drive ����Ӳ������
menu default
localboot 0xffff
3������ISO�ļ���
[root@centos7 ~]#mkisofs -R -J -T -v --no-emul-boot --boot-load-size 4 --boot-info-table -V "CentOS 6.9 x86_64 boot" -b isolinux/isolinux.bin -c
isolinux/boot.cat -o /root/boot.iso /data/boot��ע�⣺�������·����������ڹ��̵ĸ�������Ŀ¼��
һ ������������iso �ļ�������IJ���֪ʶ����Ӧ��������Ҫ�ֶ���װ
1[root@centos6 ~]# cp -r /media/ /data/centos6 ���ƹ��������е����ݣ����������ļ������ƺ�����Ϊcentos6
2[root@centos6 /data]# find -name TRANS.TBL ɾ���ļ������е������ļ�
[root@centos6 /data]# find -name TRANS.TBL -exec rm {} \; ɾ���ļ������е������ļ�
3[root@centos6 /data/centos6]# rm -rf repodata/ ɾ�����ļ��У����������µ�
4��[root@centos6 /data/centos6]# createrepo -g /media/repodata/43d8fd068164b0f042845474d6a22262798b9f0d1f49ad1bf9f95b953089777d-c6-x86_64-comps.xml .
�����ķ��飩 ���´���yum Դ��yuan����
5��[root@centos6 /data/ksdir]# vim ks6.cfg ��Ӧ���ļ��еİ�װ�������������Ϊcdrom
6:[root@centos6 /data/centos6/isolinux]# vim isolinux.cfg �������˵�
label linux
���� menu label ^Auto Install an system
���� menu default
���� kernel vmlinuz
���� append initrd=initrd.img ks=cdrom:/ksdir/ks6.cfg
label manual
���� menu label ^Manual installed an system
���� kernel vmlinuz
���� append initrd=initrd.img
label local
���� menu default
���� menu label Boot from ^local drive
���� localboot 0xffff
7��[root@centos6 ~]# mkisofs -R -J -T -v --no-emul-boot --boot-load-size 4 --boot-info-table -V "CentOS 6.9 x86_64 boot" -b isolinux/isolinux.bin -c
isolinux/boot.cat -o /root/centos6.9.iso /data/centos6/ �̹���
5������U�������� dd if=/dev/sr0 of=/dev/sdb
���䣺yum��װsz ���yum install -y lrzsz
mkisofs����
- -o ָ��ӳ���ļ�������
- -b ָ���������ɿ�������ʱ����Ŀ���ӳ���ļ�
- -c �����ɿ�������ʱ���Ὣ����ӳ���ļ��е� no-eltorito-catalog ȫ����������һ���ļ�
- -no-emul-boot ��ģ��ģʽ����
- -boot-load-size 4 �������벿�ֵ�����
- -boot-info-table ��������ͼ������ʵ��Ϣ
- -R �� -rock ʹ�� Rock RidgeExtensions
- -J �� -joliet ʹ�� Joliet ��ʽ��Ŀ¼���ļ�����
- -v �� -verbose ִ��ʱ��ʾ��ϸ����Ϣ
- -T �� -translation-table �����ļ�����ת�����������ڲ�֧�� Rock RidgeExtensions ��ϵͳ��
DHCP DISCOVER���ͻ��˵������� 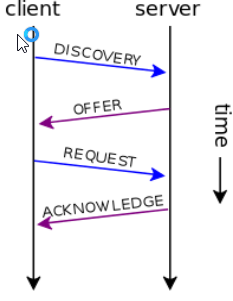
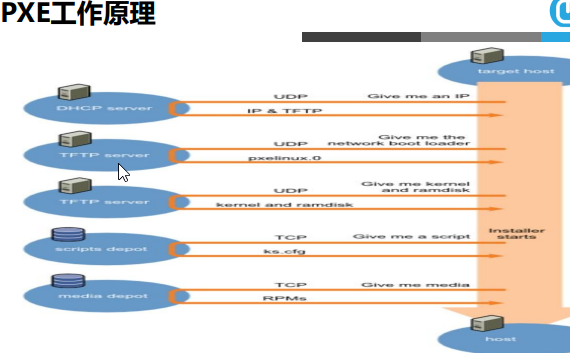
- Client��PXE Server�ϵ�DHCP����IP��ַ������Ϣ��DHCP���Client�Ƿ�Ϸ�����Ҫ�Ǽ��Client������MAC��ַ��������Ϸ���Client��IP��ַ��ͬʱ�������ļ�pxelinux.0��λ����Ϣһ������Client
- Client��PXE Server�ϵ�TFTP���ͻ�ȡpxelinux.0������Ϣ��TFTP���յ���Ϣ֮������Client����pxelinux.0��С��Ϣ����̽Client�Ƿ����⣬��TFTP�յ�Client���ص�ͬ���С��Ϣ֮����ʽ��Client����pxelinux.0
- Clientִ�н��յ���pxelinux.0�ļ�
- Client��TFTP Server������Ա�����������Ϣ�ļ�����TFTP �����pxelinux.cfgĿ¼�£���TFTP�������ķ���Client���̶�Client���������ļ�ִ�к���������
- Client��TFTP����Linux�ں�������Ϣ��TFTP���յ���Ϣ֮���ں��ļ�����Client
- Client��TFTP�����ļ�������Ϣ��TFTP���յ���Ϣ֮��Linux���ļ�ϵͳ
- Client����Linux�ں�
- Client���ذ�װԴ�ļ�����ȡ�Զ�����װ�ű�
��ǩ��
��Ȩ��������վ���²��������磬������Ȩ������ϵ��west999com@outlook.com
�ر�ע�⣺��վ����ת���������۲�������վ�۵㣬��վ���ṩ����Ӱ��Ƭ���廭�������Ʒ������ʹ�ã�����ԭ������ϵ����Ȩ��ԭ��������

��һƪ��linux��centos�����������룬��ν��
��һƪ��Kali��������ʹ�ã�һ��
- Linuxϵͳ������ÿ����Զ����нű��� 2020-06-11
- RAID 1 ����ʵ�֣�Linux ϵͳ�� 2020-06-10
- Linuxϵͳ���� 2020-06-02
- ��ԭ����Linux�ж���ϵͳ��һ��-�жϿ��������������� 2020-05-31
- ��������10�������ƽ� Linux ϵͳ 2020-05-30
IDC��Ѷ�� ������Ѷ ע����Ѷ �й���Ѷ vps��Ѷ ��վ����
��վ��Ӫ�� ��վ���� ��ӯ�� �����Ż� ��վ�ƹ� �����Դ
��վ���ˣ� �������� ���˽��� ���˵��� ������
��ҵ��Ѷ�� �������� ������Ϸ �������� ��洫ý
�����̣� Asp.Net��� Asp��� Php��� Xml��� Access Mssql Mysql ����
������������ Web������ Ftp������ Mail������ Dns������ ��ȫ����
�������ɣ� �������� Word Excel Powerpoint Ghost Vista QQ�ռ� QQ FlashGet Ѹ��
��ҳ������ FrontPages Dreamweaver Javascript css photoshop fireworks Flash
������ƣ� Java���� C/C++ VB delphi
